
Every year, we get excited for our Halloween party and start seriously planning at some point during the summer. Some of our new features each year are solid investments while others are simpler crafts that are easy to make and still have a great impact. Small diplays are a great way to fill odd spaces and end up being the little touches that everyone enjoys.
Today’s post will focus will be zombie hands. Here’s a little tidbit you may also find handy (ba-duh dum!), things in odd numbers are more pleasing to the eye.
Today’s post will focus will be zombie hands. Here’s a little tidbit you may also find handy (ba-duh dum!), things in odd numbers are more pleasing to the eye.
What you’ll need:
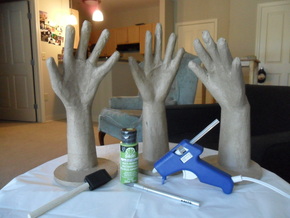
- paper mache hands from a craft store (I got mine for $8 each)
- moss green paint (mine turned out brighter than it looked but should be ok with low lighting)
- a small foam brush
- a bag of moss (check the floral section of the craft store)
- scissors
- an x-acto knife
- hot glue gun
- plenty of glue sticks, especially if you’re adjusting the heights
How:
The only kid friendly step is the painting. Please have an adult do the majority of this project!
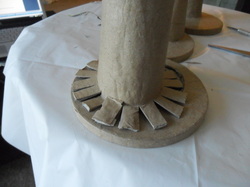
To adjust the height and create a varied look, use an x-acto knife and cut the base from the arm. You may need to saw back and forth after scoring. The ones I used were about three times the thickness of a toilet paper roll but still manageable. Once you have the pieces separated, cut slits into the arm then bend them out. Use the hot glue to reattach the arm back to the base, as pictured.
The only kid friendly step is the painting. Please have an adult do the majority of this project!
To adjust the height and create a varied look, use an x-acto knife and cut the base from the arm. You may need to saw back and forth after scoring. The ones I used were about three times the thickness of a toilet paper roll but still manageable. Once you have the pieces separated, cut slits into the arm then bend them out. Use the hot glue to reattach the arm back to the base, as pictured.
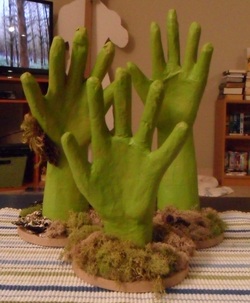
Once the glue is dried, paint the hand, arm, and however much of the base you would like. Not all of the base will need to be painted if you have enough material to cover it. I recommend painting the base close to the arm. You won’t need to put on a lot of paint. I wanted a splotchy look so some of the kraft paper is visible.
Use the glue gun and place your material around the base. Messy is best as there’s nothing perfect and orderly about Halloween.
Let everything dry, again, then you’re good to go!
I didn't really time it but since it's a quick layer of paint and hot glue dries quickly and you're slapping the material on that, I would estimate that each hand took about 10 minutes.
Variations:
Instead of moss, use a dark brown fabric, maybe a soft burlap, and they’ll look like they’re popping out of freshly disrupted dirt.
Surround one hand with lots of black fabric, a witch’s hat, and an empty pail of water and you’ve got yourself the Wicked Witch of the West.
 RSS Feed